From Bucket to Better Beer: A Practical Guide to Using a Conical Fermenter for Homebrew Success
Homebrewing is one of those hobbies that can start simply and quickly turn into a true craft. Many brewers begin with a basic plastic bucket or glass carboy, then gradually upgrade their setup as they learn more about yeast health, fermentation control, beer clarity, and flavor stability. One of the most important upgrades in that journey is the conical fermenter.
If you have ever asked yourself how to use a conical fermenter for homebrew beer, the good news is that it is not nearly as intimidating as it may seem. In fact, once you understand how it works and why it is useful, a conical fermenter can make your brewing process cleaner, more efficient, and more professional. It gives homebrewers better control over sediment removal, yeast harvesting, transfers, and overall fermentation management.
This guide explains how to use a conical fermenter step by step, from setup to cleanup. It also covers the practical benefits, common mistakes, fermentation tips, and the differences between conical fermenters and traditional fermenting vessels. Whether you are brewing your fifth batch or your fiftieth, learning how to use a conical fermenter properly can help you make better beer at home.
What Is a Conical Fermenter?
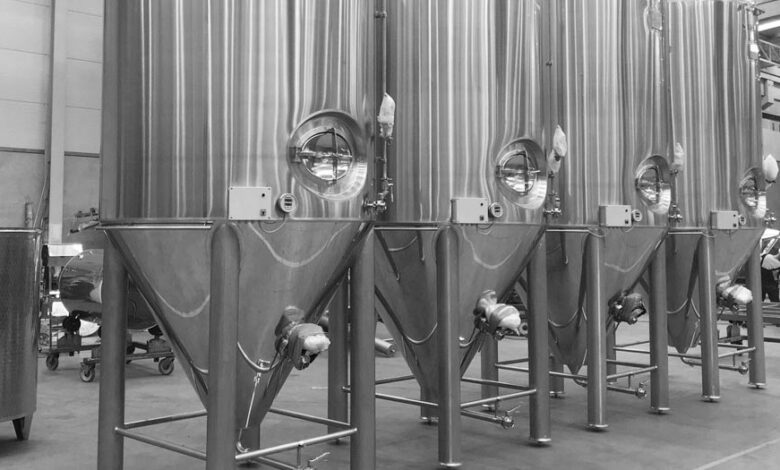
A conical fermenter is a fermentation vessel with a cone-shaped bottom. Instead of collecting sediment across a flat base like a standard bucket or carboy, a conical fermenter directs trub, hop debris, and yeast into the narrow bottom section. This allows the brewer to remove sediment more easily without disturbing the beer above it.
That cone-shaped design is the main advantage. In a traditional fermenter, the beer sits on top of all the trub and yeast sediment until you rack it off. In a conical fermenter, you can separate and dump unwanted solids through a bottom valve. That means you can keep the beer cleaner during fermentation and, in many cases, reduce the need for secondary transfers.
Conical fermenters are widely used in commercial breweries because they improve process control and make yeast handling easier. Homebrew-scale conical fermenters bring many of those same benefits into a smaller brewing setup.
Why Homebrewers Use Conical Fermenters
The biggest reason brewers upgrade to a conical fermenter is control. A standard fermenting bucket can still make good beer, but a conical fermenter gives you more ways to manage the fermentation process with less mess and less risk.
One major benefit is cleaner beer. Since sediment settles into the cone, you can remove trub and excess yeast before packaging. That can improve clarity and reduce the amount of unwanted material that ends up in bottles or kegs.
Another advantage is yeast harvesting. A conical fermenter allows you to collect yeast from the bottom valve, which can be reused for future batches if handled properly. This saves money and helps brewers maintain consistency.
Conical fermenters also reduce transfers. Every time you move beer from one vessel to another, you increase the risk of oxidation and contamination. Since many conical fermenters allow dumping sediment and racking clear beer from the same vessel, you can often do more with less handling.
For brewers who want to grow their skills and understand how professional systems work, learning from professional brewing equipment solutions can also provide useful insight into sanitary design, vessel construction, and fermentation control.
Types of Conical Fermenters for Homebrew Use
Not all conical fermenters are the same. Homebrewers can choose from several types depending on budget, batch size, and brewing goals.
Plastic conical fermenters are generally more affordable and lighter to handle. They are a good starting point for brewers who want the shape and function of a conical vessel without spending too much. However, plastic can scratch more easily, and scratches may become places where bacteria hide if cleaning is not done carefully.
Stainless steel conical fermenters are more durable, easier to sanitize thoroughly, and often preferred by serious homebrewers. They also tend to look and feel more like commercial brewing equipment. Many stainless options include valves, sample ports, thermowells, pressure features, and compatibility with temperature control systems.
Some conical fermenters are simple gravity-fed vessels, while others support closed transfers, pressure fermentation, or even carbonation. The right option depends on how advanced you want your homebrew setup to become.
Choosing the Right Size Conical Fermenter
Size matters more than many brewers first realize. If you usually brew five-gallon batches, a fermenter with extra headspace is important because fermentation creates foam, or krausen, that can rise significantly during the most active phase.
For a five-gallon batch, many brewers prefer a seven-gallon conical fermenter to allow enough room for krausen and reduce the risk of blowoff. If you brew larger batches or want flexibility, you may choose a larger vessel.
At the same time, a fermenter that is too large for your batch size can create excessive headspace, which may not be ideal once fermentation slows and oxygen protection becomes more important. Match the fermenter size to your common batch volume and brewing habits.
You should also think about physical space. Stainless steel conical fermenters often require a stand, legs, or a cooling setup, so make sure the height and footprint fit your brewing area.
How to Set Up a Conical Fermenter Before Brewing
Proper setup begins well before wort enters the vessel. First, assemble all parts according to the manufacturer’s instructions. Most conical fermenters include at least one bottom dump valve, one side valve or racking port, seals, clamps, and a lid system. Some also include sampling valves, pressure fittings, or thermometers.
Before use, inspect every gasket, fitting, and clamp. A small leak can become a major problem once the fermenter is full. Make sure valves open and close smoothly and that all threaded parts are properly tightened without overtightening.
Next, clean the vessel thoroughly. Cleaning removes visible soil, residue, and manufacturing oils. After cleaning, sanitize everything that will touch the cooled wort or fermented beer. This includes the inside of the fermenter, the lid, all valves, the airlock or blowoff tube, and any transfer tubing.
If your conical fermenter includes a stand or legs, position it where fermentation will take place before filling it. Moving a full fermenter can be difficult and risky. If you use a temperature control chamber, cooling wrap, or glycol system, connect and test that setup in advance.
Transferring Wort into the Conical Fermenter
Once your wort has been boiled and chilled to the correct yeast-pitching temperature, it is time to transfer it into the fermenter. This part should be done as cleanly and gently as possible.
Use sanitized tubing or a sanitized pump if your setup includes one. Avoid splashing hot-side wort earlier in the process, but after chilling, controlled aeration is usually beneficial because yeast needs oxygen at the beginning of fermentation. Many homebrewers allow some splashing during transfer or add oxygen with a stone or aeration system after the wort is in the fermenter.
Try to leave behind excessive kettle trub if possible, although some brewers intentionally transfer a moderate amount and then dump it out later from the cone. One of the strengths of a conical fermenter is that it gives you options here.
Once the wort is inside the vessel, pitch the yeast according to the style, gravity, and yeast manufacturer’s guidance. Seal the fermenter and attach an airlock or blowoff tube.
Managing Primary Fermentation in a Conical Fermenter
Primary fermentation is where the yeast does most of its work, converting sugars into alcohol, carbon dioxide, and flavor compounds. During this stage, your main priorities are temperature control, cleanliness, and patience.
A conical fermenter helps because it is built for stability and sediment separation, but it still requires active management. Monitor the fermentation temperature carefully. Different yeast strains have different preferred temperature ranges, and controlling temperature is one of the biggest factors in making clean, professional-tasting beer.
You may notice bubbling within hours or it may take longer depending on pitch rate, wort temperature, yeast vitality, and beer style. Avoid opening the fermenter unnecessarily during this stage. The sealed environment is part of what protects your beer.
As fermentation progresses, solids begin dropping into the cone. This includes trub, hop particles, and eventually yeast. One of the advantages of a conical fermenter is that you can choose when to remove those solids rather than letting them sit under the beer for the entire fermentation.
When and How to Dump Trub and Yeast
This is one of the most important skills when using a conical fermenter. Dumping sediment too early can remove healthy yeast before fermentation is complete. Dumping too late may reduce some of the practical benefit.
In general, many brewers wait until active fermentation is well underway or mostly complete before dumping the first portion of sediment. The first dump often contains heavy trub and hop material, especially if you transferred more kettle solids into the fermenter. After that, later dumps may collect yeast.
To dump sediment, attach a sanitized container to the bottom valve if possible, or position one directly beneath it. Open the valve slowly. The material coming out at first may be thick and dark. Once it begins to look more like beer than sludge, close the valve.
The exact timing depends on your process, yeast strain, and beer style. For some beers, one dump may be enough. For others, especially hop-heavy beers, you may choose to remove solids more than once.
The key is to be deliberate. Do not dump automatically without understanding what is coming out and why.
Using a Conical Fermenter for Yeast Harvesting
One of the best features of a conical fermenter is the ability to collect yeast for reuse. Once fermentation is complete and the yeast has settled into the cone, you can remove a portion of it through the bottom valve.
Clean yeast harvesting depends on timing and sanitation. The earliest sediment in the cone often contains a mix of trub and less desirable material. Later harvests, after the beer has had time to settle, may yield cleaner yeast.
Collect the yeast in sanitized jars or containers. Label them with the beer style, yeast strain, and date. Store them cold if you intend to reuse them. Keep in mind that not all harvested yeast should be reused indefinitely. Yeast health, sanitation, and the character of the previous beer all affect whether reuse is a good idea.
Still, for homebrewers who want to save money or maintain consistency across batches, a conical fermenter makes yeast collection far easier than a standard bucket or carboy.
Can You Skip Secondary Fermentation?
For many beers, yes. One major reason brewers like conical fermenters is that they often eliminate the need for a separate secondary vessel. Because you can remove sediment from the cone and keep the beer on the same vessel, there is less reason to rack into another fermenter unless you have a specific purpose.
In older homebrewing practice, secondary fermentation was often used to separate the beer from sediment or to improve clarity. With a conical fermenter, both of those goals can often be achieved without another transfer.
That means less oxygen exposure, less contamination risk, and less equipment to clean. However, there are still times when a secondary vessel may make sense, such as long-term aging, fruit additions, oak contact, or mixed fermentation projects.
For standard ales and many lagers, a conical fermenter can handle the full fermentation and conditioning process very effectively.
Racking Beer from a Conical Fermenter
When fermentation is complete and the beer is ready to package or move to a keg, you can rack it from a side port or rotating racking arm, depending on the design of your fermenter. This helps pull clearer beer from above the sediment layer.
Before racking, cold crashing can be helpful if your setup allows it. Lowering the temperature encourages yeast and haze-forming particles to settle out. This often improves clarity before packaging.
Use sanitized transfer lines and, if possible, a closed transfer method to reduce oxygen pickup. This is especially important for hop-forward styles like IPA, where oxidation can damage aroma and flavor quickly.
Because the conical fermenter separates sediment into the bottom cone, the beer drawn from the racking port is often cleaner than beer taken from a basic fermenting bucket. This can make packaging smoother and reduce sediment in the finished product.
Cleaning and Sanitizing After Use
A conical fermenter is a great tool, but it must be cleaned carefully after every batch. The extra valves and fittings give you more control, but they also create more places where residue can hide if you are not thorough.
Start by rinsing the vessel soon after use so dried yeast and protein do not become harder to remove. Disassemble valves, fittings, and gaskets if the design allows it. Clean every part with an appropriate brewery-safe cleaner.
Pay special attention to the inside of valves and ports. These are common trouble spots. Once cleaning is complete, rinse thoroughly and allow the equipment to dry. Sanitize again before the next use.
Stainless steel vessels generally make this process easier over the long term because they resist scratches and can tolerate more rigorous cleaning. Brewers who want to better understand commercial-style sanitation and vessel design often look at craft brewing equipment systems to see how professional setups are built for easier process control.
Common Mistakes to Avoid
A conical fermenter can improve your beer, but only if you use it correctly. One common mistake is dumping yeast too early. During active fermentation, yeast is doing essential work. Removing too much of it too soon can slow fermentation or leave the beer unfinished.
Another mistake is poor valve sanitation. Because conical fermenters include extra fittings, brewers sometimes sanitize the main vessel well but overlook the small parts where contamination can develop.
Overcomplicating the process is another issue. Some brewers buy a conical fermenter and immediately try every advanced technique at once. It is better to learn the basics first: proper transfers, sediment dumping, temperature control, and clean packaging.
Finally, do not assume that a conical fermenter automatically fixes poor fermentation practices. Healthy yeast, good temperature control, proper pitching rates, and solid sanitation still matter just as much as ever.
Is a Conical Fermenter Worth It for Homebrewers?
For casual brewers making occasional batches, a bucket or carboy may still be enough. But for homebrewers who want better control, cleaner transfers, yeast harvesting, and a more professional process, a conical fermenter is often worth the investment.
It is especially valuable if you brew regularly, enjoy experimenting with process improvements, or want to reduce oxidation and contamination risks. The more you brew, the more useful the extra control becomes.
A conical fermenter will not replace good brewing technique, but it does support it. It gives you tools that help make those techniques easier to apply consistently.
Final Thoughts
Learning how to use a conical fermenter for homebrew beer is one of the best ways to take your brewing process to the next level. It helps you manage sediment more effectively, simplify transfers, harvest yeast, and create cleaner, more consistent beer. More importantly, it introduces you to the same fermentation principles used in professional breweries, but at a scale that fits your home setup.
For brewers who want to move beyond the basics and build a more serious system over time, a conical fermenter is not just a fancy upgrade. It is a practical tool that can improve both beer quality and brewing workflow.
If you are interested in stepping up from homebrew-scale gear to more advanced brewing setups, Micet’s beer brewing equipment products are worth considering. Micet offers professionally built brewing systems designed for durability, sanitary performance, and brewing efficiency, making them a strong choice for brewers who want reliable equipment and room to grow.
FAQs
1. How long should beer stay in a conical fermenter?
The answer depends on the beer style, yeast strain, and fermentation temperature, but many ales remain in the fermenter for two to three weeks from pitch to packaging. Lagers and stronger beers may need more time. The advantage of a conical fermenter is that you can remove sediment during the process, which can help maintain beer quality during longer conditioning periods.
2. Do I need to transfer beer to a secondary fermenter if I use a conical fermenter?
In many cases, no. A conical fermenter often removes the need for a separate secondary vessel because you can dump sediment and keep conditioning the beer in the same fermenter. This reduces handling, lowers oxidation risk, and simplifies the process. Some brewers still use secondary vessels for special additions or long aging projects.
3. Can beginners use a conical fermenter successfully?
Yes. A beginner can absolutely use a conical fermenter, as long as they understand the basics of cleaning, sanitation, and fermentation control. It may have more parts than a bucket fermenter, but it can also make some tasks easier once you learn the workflow. Starting simple and gradually using more of its features is often the best approach.